Little Black Dress

My mother swears that the only thing I ate until the age of 12 was broccoli. Sylvie agrees, and a family friend once reminisced about my being in a high chair, too young to form full sentences, but making my points using fistfuls of broccoli. Well, Lilli is a bit like her mom in that regards. She is a broccoli fiend. It’s very cute to watch because she eats it upside down: She holds the floret in her fist and starts at the stalk. I keep on trying to explain to her that the stalk is the perfect handle, but she seems very set in her ways for now. Hey, she only learned her name about a month and a half ago. Baby steps.

Lilli and her broccoli

I’ve only served it to her roasted, which, in my humble, broccoli loving opinion, is the yummiest way to eat the vegetable. When you roast it, bits of the shrub brown and caramelize and taste almost candy-like. Sylvie was in Seattle last January, and something called blasted broccoli had become very chic in the city. That, and Macklemore. I kind of can’t believe I just wrote that there’s a hot new broccoli dish around, but I did. I poked around online and gave blasted broccoli a shot. It was good, but unnecessary. All you need is a sprinkling of kosher salt, some olive oil, and a hot, hot oven.

I mention my broccoli love well into the third year of writing this blog, because there is a farro and roasted broccoli salad that I make pretty constantly. For me, it’s a bit of a little black dress recipe: Something that’s totally reliable and always tastes good. It’s so the norm in my kitchen that I’ve never bothered to mention it, but, it’s been a weeknight staple in our house for a long time. Roasting broccoli takes about 20 minutes, which is how long it takes to cook the farro in my pressure cooker.

roasted broccoli and farro salad

When both are ready, I heat a pan with oil, add some minced garlic, break off about a tablespoon of tomato paste I keep on hand in the freezer, then add the farro and roasted broccoli and cook it all up for about five minutes. I’m not exactly sure where I came up with this method, but a few months back I was reading about the history of Israeli cous cous (extremely fascinating and worth the read) and I noticed that the tomato paste sauté is a popular way to serve the pasta in that country. I don’t remember learning that at any point, but perhaps it’s my Zionist leanings leading the inspiration.

Although I’ve read a few places online recently that you don’t have to soak your farro, I consistently do. I can’t risk having uncooked grains when we need to have dinner. I promise you, soaking grains is simple and not a big deal. Right before I go to bed, I pour a cup of farro into a bowl on my counter top, cover it with water, and walk away. That’s pretty much my go-to with all the grains and beans in my pantry. Except for lentils; those I know for certain don’t need any soaking. At some point, I’ll share a killer lentil soup recipe. Good freezer recipe, I might add. Speaking of freezers, farro, like most grains, freezes beautifully. I wouldn’t freeze this salad, but if you have extra farro in your fridge and worry you might not get to it, just pop it in the freezer. It defrosts like a dream.

BONUS PHOTO! Leo eating roasted broccoli

BONUS PHOTO! Leo eating roasted broccoli

Roasted Broccoli and Farro Salad

1 bunch roasted broccoli

Pinch of kosher salt

About a Tablespoon and a half of olive oil

1 cup dry farro

2 cloves minced garlic

1 Tablespoon tomato paste

Directions

Soak your farro the night before. See note above for more of an explanation why I insist on doing so.

Preheat oven to 400F.

When ready to cook, add the farro to your pressure cooker. Cover with water. I tend to add water until it’s a half an inch past the grain.– I always add a bit more water to the cooker than I might need to. I’d rather drain off water than scorch my pot. The farro will cook in 20 minutes once pressurized.

While the farro is roasting, clean your broccoli by giving it a good rinse, trimming the green leaves off the stalk, and cutting it into bite-sized pieces. I use my stalks too; just trim off the woody parts and it’ll be fine.

Cover a baking sheet with tinfoil. I do this first, a. because my hands are about to get oily because of the broccoli toss and b. so I don’t have to give the pan a good scrubbing in my kitchen clean up.

In a large bowl toss the broccoli with the kosher salt and enough olive oil to coat. Dump the broccoli onto the foil-covered baking sheet. Roast in the oven for 20 minutes.

While the broccoli roasts and the farro is cooking, mince up two garlic cloves.

When both are done cooking, and you’ve drained your farro in a colander in the sink, heat up a skillet with enough olive oil to coat the pan, and add the garlic and tomato paste. Because I always use frozen tomato paste, it really becomes a matter of melting the paste into the garlic and oil. Once the tomato paste has coated the garlic, add the farro and broccoli. The farro will turn an orangey hue. Add a pinch of kosher salt. Heat everything together so that it combines. This should take about five minutes. Serve and enjoy.

Last week I decided to add a little chile pepper to the tomato paste step. Good stuff if you have it on hand, but not necessary.

Food-drunk at Beyond Bubbe’s Kitchen

I have a problem. I don’t know if it’s treatable, or if it’s just one of those lifelong maladies. When I am at a function — bar mitzvah, wedding, food blogger’s cocktail hour — I lose all sense of control and eat until I’m food-drunk. Literally, intoxicated. We once went to the Phantom Gourmet block party, and a few hours in, Rich found me stumbling around Landsdowne Street,  Zeppy’s bagel in my left hand, and a chunk of chocolate in my right. I still don’t remember how we got home.

This is all by way of explaining why I have no pictures to show you from Beyond Bubbe’s Kitchen on Sunday night. Oh, I brought my camera, and even the tripod. But how can I take photos of food AND eat it at the same time?

Words will have to suffice. First, there was moist brisket, crowned with onion confit and a sprinkling of pomegranate seeds,  cooked by Julio de Haro of Estragon. But I had to hustle, because rumor was Erwin Ramos from Ole! was about to run out of chocolate tamales! (Not to worry, they brought strawberry tamales as a back-up — vanilla custard sauce, people!) I may have had more than one bowlful of Tony Maws’ from Craigie on Main’s kasha varnishkes with homemade pasta and duck confit. Have I mentioned Michael Leviton of Lumiere‘s sweet, yet savory, Purim-inspired poppy seed “Oreo” cookies with poppy seed filling, which were served with a Bourbon-spiked milkshake? No? Oops, because I had three.

Somehow, I managed to stay lucid enough to meet Jewish cookbook writer extraordinaire Joan Nathan. But a funny thing happens to me when I am around certain cookbook authors. They are my version of rock stars, so I get really nervous, a bit giddy, and start talking really fast. Honestly, put me in a room with any of this year’s Oscar nominees, I’d be as cool as a bourbon-spiked milk shake, but put me near a cookbook author who has a section in my cookbook collection, and I’m a puddle. God help me if I’m ever near Mollie Katzen or Deborah Madison. This fall I met Mark Bittman, and I’m still not 100% sure what I babbled at him.

The recipes I have here, homemade ricotta and pickled beet salad, are from Jeremy Sewall of the Eastern Standard — sort of. His recipes were a bit sparse — Hemingwayesque, really — so I’ve added more detailed directions.  Also, I couldn’t help but modify the beets for my favorite kitchen companion, the pressure cooker.

Homemade Ricotta

Ingredients

1 gallon whole milk

Juice of 1 lemon

1 tablespoon salt

Hardware

A large pot

Thermometer (not necessary, but helpful)

Wooden spoon

Cheesecloth — The regular grocery store on the corner sells this, I promise. If you can’t find it, just ask.

Colander

Twine

Directions

Place milk and salt in the large pot, and bring to a slow simmer, making sure it doesn’t boil or scald. It should take about 45 minutes. Every so often, stir the milk, from the bottom, with the wooden spoon, to ensure the milk doesn’t brown and get stuck to the pot. (I speak from experience.)

While the milk is heating, line the colander, which should be sitting in your sink, with a double layer of cheesecloth.

When the milk reaches 175 degrees ( a gentle simmer) add the fresh lemon juice, and stir gently with your wooden spoon. Then, the most magical thing happens: curds and whey begin to separate in the pot. This should take no more than 10 minutes.

Next, take your pot over to your colander and spoon the curds and whey into the awaiting cheesecloth. Do not pour it, as that will destroy the delicate curds. Gently fold up the corners of the cheesecloth, and tie them up with the twine. DO NOT SQUEEZE. If possible, hang the cheesecloth above the pot as the whey drains.

In two hours, cut the twine, open up the cheesecloth, and gaze at your homemade, pillowy clouds of fresh ricotta.

Quick Pickled Beets

1 large beet, peeled, washed, stem and root removed.

(I had two small beets in my fridge, just hanging out — it is Cheap Beets — so I used those.)

Equal parts sherry vinegar and water, to one-half part sugar.

(Again, I wandered away from the directions. I used about a cup of water, 3/4 cups red wine vinegar, and a half-cup sugar.)

Preheat oven to 375

Place all ingredients in a small pan that is large enough to hold the whole beet. Cover with foil and braise in oven until you can pierce through the beet with a paring knife; it should take between 60 – 80 minutes.

(I used my pressure cooker, placing all ingredients in the pot and cooking for about 20 minutes. It was perfect.)

Sewall serves his salad with segments of a blood orange. I did not have any on hand, but if you do, I am sure it would taste delicious.

Butternut Basics

Butternut squash risotto: seven minutes in a pressure cooker.

As I mentioned in a previous post, work and school have been really crazy lately, and with Rich doing campaign things, sharing a meal together has become a precious commodity. I know I must sound like a broken record by now, but with my trusty pressure cooker and my well-stocked pantry, we have continued to enjoy tasty, inexpensive and quick meals.

One of my go-to dishes when I’m in a time crunch is butternut squash risotto. What?!? Impossible! you’re thinking. But I swear to you, if you buy a pressure cooker, you too can make risotto in seven minutes. Yup, that’s all it takes. Just buy a pressure cooker; most likely it will come with a recipe for risotto. (Results, and recipes, may vary by make and model, so I am not posting a full recipe here.)

In terms of ingredients, all you need is some Arborio rice (which Ocean State Job Lot will sell you for $2.99 a box), a chopped-up onion (pantry staple), a hunk of parmesan (which should just kind of hang out in your fridge’s cheese drawer) and a few cups of stock.

Now, I must admit I am spoiled by Rich who enjoys taking a few hours on his weekends to make homemade stock with leftover chicken carcasses (we keep them frozen until he has the time) and some odds and ends from my veggie drawer. Once it’s cooled off, we pour the stock into ice cube trays, freeze them, and then store the stock cubes in Ziploc bags in the freezer. But, in all seriousness, just keep a box in the pantry. As Julia Child (or Rachael Ray) would say, who’s to know if you take short cuts?

Now that that’s squared away, the only thing standing between you and a nice autumnal dish is that pesky butternut squash. Sure, you can buy it pre-cut from Trader Joe’s, or even find it in your grocer’s freezer, but the cheapest way to enjoy butternut squash is to buy it whole and clean it yourself.

I know that might sound daunting. But I promise you can do it. Here’s how:

First, take your butternut squash and cut it in half, so that you have a distinct round bottom.

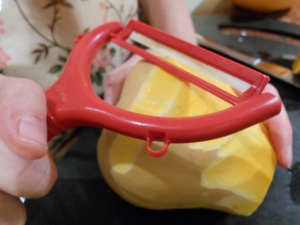
Then, peel it. Yup, it’s just that simple. I have very good Kyocera ceramic peeler that my awesome brother-in-law got me for a birthday present last year which does a great job. Now, I’m not trying to sell Kyocera products (or even a specific brand of pressure cookers, for that matter) but, if you don’t think your peeler can handle peeling squash, then I would suggest purchasing a new, sturdier peeler. It should cost less than $15.

After you’ve peeled both pieces of your squash, cut the round bottom one in half, and scrape out the seeds. Then cut your squash into thirds, and then start dicing.

Yup, it’s really that simple.

Once you’ve cleaned your squash, prepare your risotto according to the instructions that came with your pressure cooker, and right before you put the lid on, dump the squash into the pot.

The squash will soften into the rice mixture and, by the time you unlatch the lid, become one with your risotto. I happened to have a rind of parmesan in my fridge which I tossed in pre-pressure, too.  In general, if you find yourself with just the rind of a piece of cheese, keep it in the fridge, and the next time you are making soup, toss it right in. It will add layers of rich flavor to your soup — or in this case, your risotto.

Latch things up, pressurize, cook according to your machine’s instructions, then blow off the steam. Here’s where you add the good stuff: butter and grated cheese. This time, I also threw in some sage from the bush out front. You could also go with goat cheese and rosemary, a la Grendel’s, if you prefer. And there you have it: a fast, simple dish made with pantry staples and one fresh veggie.

Dinner for Two Becomes Dinner for Five

Shabbos dinner somehow grew from just me and Rich to three guests at our table Friday night. In my fridge I had three beets, a head of cabbage, five mushrooms, and a block of feta. We feasted.

I was very silly and didn’t take photos of our food before we supped, so what I have here are leftovers — hooray for leftovers! I have no shots of the cabbage and mushrooms, which turned out to be the hit of the night. I didn’t do anything special to them — just sauteed up an onion for  a good long time until it began to caramelize, tossed in some garlic, then the mushrooms, then the cabbage.  Right before I took it off the flame I added two sage leaves. All I did was cook the cabbage down until it was too exhausted to put up a fight anymore. Limp, molted green and muddy brown, it probably wouldn’t have made very pretty picture, but it tasted great.

The beets took 25 minutes in the pressure cooker.A very simple dish: I cubed the beets, and half a block of feta, then drizzled balsamic vinegar and sprinkled fresh mint (from my container plants outside) on top.

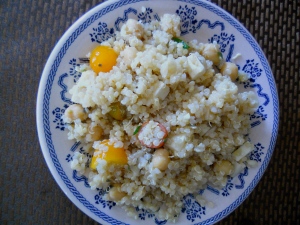
I used the other half of feta for the quinoa, chickpea, and farmers’ market tomato salad. I cooked the chickpeas in the pressure cooker for 11 minutes with some bay leaves, a teaspoon or so of whole black peppercorns and two cloves of garlic, unpeeled. While that was going on, I cooked the quinoa in my rice cooker — no muss, no fuss. Quinoa is a great pantry staple: protein, carbs, fat, calcium, you can get a pound of it for less than $4 in bulk at Harvest Co-op.

As for feta, here’s a tip: If you go the Market Basket in Somerville — which, by the way, has FANTASTIC produce at the some of the best prices in town — head over to the deli counter. On the right hand side up against the wall is a counter fridge. Inside you’ll likely find huge blocks of really decent feta for about $4.

To dress the quinoa salad, I combined:

6 TBS olive oil

3 TBS red wine vinegar (I like my lips to pucker, so I always go 2 to1 with my dressings, while I think most recipes will say 3 to 1)

1 clove of garlic, minced

1/8 teaspoon mustard (I’m actually pretty anti-mustard, but it can’t be beat for emulsifying salad dressings)

a pinch of salt

a few grinds of fresh black pepper

2 teaspoons agave nectar (you can do honey, too, but I like the sweetness of agave, and it’s good to have on hand for vegan salad dressings)

2 TBS chopped fresh mint

I put all these together in a glass jar, and shook. That’s all. This is basically the blue print for all my dressings.

Make sure to let the quinoa cool down before you dress it. Otherwise it will soak up everything and you’ll be wondering where all your flavor went. I speak from experience!

Quinoa salad on one of my new plates... thanks Freecycle!

Tomato, tomahto

Normally, I’m skeptical of farmers’ markets. True, they are local and sustainable and organic, but they can also be extremely expensive. Last summer I spent $40 on a bag of gorgeous produce only to use it all in one meal. But this is Massachusetts Farmers’ Market Week, so I decided to take a lunchtime bike ride to BU’s on-campus farmers’ market, in hopes of procuring peaches for some ice cream action this weekend.

I had the most lovely visit with the folks from Wards Berry Farm in Sharon. And I scored. Big time. For $6, I biked away with gorgeous tomatoes, peaches and garlic:

All this for $6!

The kind gentleman running the stand noticed my means of transport and noted that the farm is only three miles from the commuter train. A weekend visit to the farm may be in the future…

I’ll get at least two meals out of these tomatoes:

I wanted to gobble these at my computer this afternoon. Hooray willpower!

Like I’ve said, stock a good pantry, and you’re good to go. Tonight I made an easy pasta with the fresh tomatoes and garlic, then tossed in some artichoke hearts and olives.

This reminds me of that Skittles commercial. A rainbow of flavor!

(The husband, who normally hates tomatoes of the grape or cherry varieties, snarfed up dinner so fast that I didn’t get a chance to photograph it.)

I also set some chickpeas up to soak overnight for a quinoa, chickpea and tomato salad for Shabbos dinner tomorrow night.

Chickpeas in a pressure cooker: 11 minutes to perfection.

Friday is my neighborhood farmers’ market. I’m definitely biking by on my way home to see if I can get some fresh basil for my basil-peach ice cream. My plant’s on its last leaves at this point in the summer.

Make me into ice cream, stat!

Come back this weekend for the recap on deliciousness.