Campaign Cookies: Why I started baking.

Cookies for volunteers.

I never considered myself much of a baker. But when I captained a phone bank in last year’s special election (don’t get me started), I thought the least I could do for my volunteers was to reward them with some good cookies. I came across this recipe and took a liking to it.

After mastering this simple recipe, I realized there was nothing stopping me from baking all sorts of things, from lemon bars to macarons to challah to apple cake.  But today, I found myself wanting to bake these cookies again.

This is a pantry recipe. It involves butter, which should just live in your freezer, so you’ll always have it at hand. You should have eggs in the fridge, and everything else you’d have on hand in your pantry. Chocolate chips and dried fruit? In your pantry. Or, you might have to store chips in your freezer if your pantry gets too warm in the summer.

I actually had a bit of trouble with some of my batches of cookies today. The recipe wasn’t off. My oven was. So the cookies in the pics you have here are not my best work. But I promise you it makes a good cookie. If you’re into chewy with lots of good bits of stuff, this recipe is for you. Side note: I actually like the way these cookies taste the next day more than a few hours out of the oven.

The recipe I like to use is from The Fannie Farmer Cookbook, which has the same ingredients as Toll House, but in different measurements.  They also differ on greasing the pans: Fanny is pro and Toll House is con.

The cookies in these pictures are a mixture of the newly invented Cherry Garcia, chocolate and peanut butter chips, chocolate chip and heath crunch. (I intentionally leave nuts out of my cookies when I don’t know who I’m baking for; it’s just safer that way. But if you know who you’re baking for, have fun with the nuts.)

The amount you want to pay attention to is 1 cup of chips to half a cup something else, say dried fruit or nuts. Make sure to chop up whatever that is, be it dried fruit, or nuts, or both. The Cherry Garcia cookies, for instance, were 1 cup of chips to half a cup chopped dried cherries — which Ocean State Job Lot always has on hand. The Heath Bar Chip? A cup of chips to a half cup Heath Bar bits; the Heath English Toffee Bits, “Bits O’ Brickle Toffee Bits” were actually a pantry addition by Rich and Mike.

Whatever “side” your on, if you want to help out on a campaign but feel weird about talking to strangers, you can pitch in by baking a batch of cookies for the volunteers.

Chocolate Chip Cookies

Adapted from The Fannie Farmer Cookbook

As you can see, the recipe doubles easily

1/4 pound butter

1/2 dark brown sugar

1/2 cup granulated sugar

1 egg

3/4 teaspoon vanilla

1 cup and two tablespoons flour

1/2 teaspoon salt

1/2 teaspoon baking soda

1/2 cup chopped nuts or chopped dried fruit, or both

6 ounces semisweet chocolate chips (1 cup)

Preheat oven to 375 and grease some cookie sheets. Cream the butter, then gradually add the two sugars, beating until light and smooth. Beat in the egg and the vanilla. Mix the flour, salt and  baking soda and add it to the first mixture blending well. Stir in the nuts/dried fruit and the chocolate chips. Drop by teaspoonfuls* onto the cookie sheets about 1 inch apart and bake for 8-10 minutes or until lightly browned.

*Please read below for more on this cookie scoop.

Both recipes say you can make an average of 55 cookies with this recipe. It’s more like 2 dozen.

*I don’t usually complain about products, but feel I must in this case. Two weeks ago I had attempted to make cookies for the campaign, but my cookie scoop lost one of its rivets that held the sweeper in place. I couldn’t bring those to the campaign; what if someone bit on that rivet? I brought it back to Crate and Barrel, and they replaced it immediately. This is what happened during today’s baking.

This product is garbage.


Boston Vegetarian Food Festival This Weekend

Rich is spending his weekend doing GOTV, but I plan on slipping away for a few hours to check out the Boston Vegetarian Food Festival. This year it’s on both Saturday and Sunday, and it sounds like it’s going to be a good time. Lots of food to sample, cooking demonstrations to watch, and some interesting lectures to attend. My suggestion is to bring an empty stomach and an open mind. And it’s all free!

Butternut Basics

Butternut squash risotto: seven minutes in a pressure cooker.

As I mentioned in a previous post, work and school have been really crazy lately, and with Rich doing campaign things, sharing a meal together has become a precious commodity. I know I must sound like a broken record by now, but with my trusty pressure cooker and my well-stocked pantry, we have continued to enjoy tasty, inexpensive and quick meals.

One of my go-to dishes when I’m in a time crunch is butternut squash risotto. What?!? Impossible! you’re thinking. But I swear to you, if you buy a pressure cooker, you too can make risotto in seven minutes. Yup, that’s all it takes. Just buy a pressure cooker; most likely it will come with a recipe for risotto. (Results, and recipes, may vary by make and model, so I am not posting a full recipe here.)

In terms of ingredients, all you need is some Arborio rice (which Ocean State Job Lot will sell you for $2.99 a box), a chopped-up onion (pantry staple), a hunk of parmesan (which should just kind of hang out in your fridge’s cheese drawer) and a few cups of stock.

Now, I must admit I am spoiled by Rich who enjoys taking a few hours on his weekends to make homemade stock with leftover chicken carcasses (we keep them frozen until he has the time) and some odds and ends from my veggie drawer. Once it’s cooled off, we pour the stock into ice cube trays, freeze them, and then store the stock cubes in Ziploc bags in the freezer. But, in all seriousness, just keep a box in the pantry. As Julia Child (or Rachael Ray) would say, who’s to know if you take short cuts?

Now that that’s squared away, the only thing standing between you and a nice autumnal dish is that pesky butternut squash. Sure, you can buy it pre-cut from Trader Joe’s, or even find it in your grocer’s freezer, but the cheapest way to enjoy butternut squash is to buy it whole and clean it yourself.

I know that might sound daunting. But I promise you can do it. Here’s how:

First, take your butternut squash and cut it in half, so that you have a distinct round bottom.

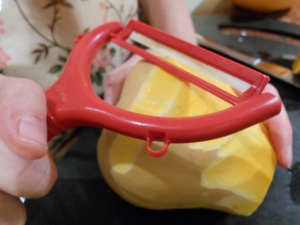
Then, peel it. Yup, it’s just that simple. I have very good Kyocera ceramic peeler that my awesome brother-in-law got me for a birthday present last year which does a great job. Now, I’m not trying to sell Kyocera products (or even a specific brand of pressure cookers, for that matter) but, if you don’t think your peeler can handle peeling squash, then I would suggest purchasing a new, sturdier peeler. It should cost less than $15.

After you’ve peeled both pieces of your squash, cut the round bottom one in half, and scrape out the seeds. Then cut your squash into thirds, and then start dicing.

Yup, it’s really that simple.

Once you’ve cleaned your squash, prepare your risotto according to the instructions that came with your pressure cooker, and right before you put the lid on, dump the squash into the pot.

The squash will soften into the rice mixture and, by the time you unlatch the lid, become one with your risotto. I happened to have a rind of parmesan in my fridge which I tossed in pre-pressure, too.  In general, if you find yourself with just the rind of a piece of cheese, keep it in the fridge, and the next time you are making soup, toss it right in. It will add layers of rich flavor to your soup — or in this case, your risotto.

Latch things up, pressurize, cook according to your machine’s instructions, then blow off the steam. Here’s where you add the good stuff: butter and grated cheese. This time, I also threw in some sage from the bush out front. You could also go with goat cheese and rosemary, a la Grendel’s, if you prefer. And there you have it: a fast, simple dish made with pantry staples and one fresh veggie.

Pantry Panacea

I grew up with a pantry bursting at the seams with food. If you opened the door too quickly, beware of suicidal boxes of crackers and cans of beans that might take the plunge from their overstuffed home.

As much as I joke about my parents’ pantry, I know their overcompensation with food has much to do with them both being children of Holocaust survivors. They were raised with the first-hand knowledge that one day there could be no more food — or no more stores that would sell them food.

I have very vivid memories of visiting my step-grandmother in her little apartment in Queens. Her pantry, too, was overstuffed with everything from paper towels to coffee beans, long before Costco made that normal. Even though she didn’t actually drink coffee, she made sure to have it on hand, because the day could always come when there would be no more coffee.

My own pantry is definitely a result of growing up in my parents’ house:

My pantry

I’m always looking for discounted items to add to my hoard, but every couple of months I drive out to suburbia to load up at my all-time favorite: Ocean State Job Lot. For those not in the know, Ocean State Job Lot is basically a close-out store for common brand-name goods. Or, as my husband theorizes, stuff that “fell off the back of a truck.”

My friend Mike teases me and says I pretty much get like this when I get started on Ocean State. For years I thought that Ocean State Job Lot was my own jealously guarded secret. In fact, I actually kind of freaked when The Boston Globe wrote about it a few years back. “Nooooo,” slow-motion-me cried, “now everyone knows!” I was right to freak out, because the next time I went to OSJL the pasta shelves were barren.

Yes, everything in this picture is from Ocean State Job Lot.

It’s been a while now, so I think it’s ok for me to talk about it without worrying there’s going to be another run on $1.50 packets of gnocchi. Or $2.50 San Marzano canned tomatoes. Or a bag of dried cherries for $2.79. Or a box of Arborio rice for $3.00. Or a can of artichoke bottoms for $2.00. Or a pound of pecans for $3.00. You get the picture: This place is amazing.

(Also, the one I go to in Danvers is in the same lot as Savers, the best used clothing store I’ve ever been to and where I get the bulk of my clothes.  And sandwiched in between these two amazing stores is a mega-sized used book store. Mark-Down Mecca.)

Putting my pantry neurosis aside, having a stockpile of staples is the key to frugal cooking. As I’ve written about in previous posts and will continue to do, a good pantry allows you to work wonders with even a single fresh veggie. Stay tuned for my next post, which does exactly that, as well using one of my favorite kitchen time savers: the pressure cooker.

“You’re never fully dressed…”

Magical miso dressing atop some crisp Romaine and a few discs of Daikon radish.

I didn’t have a meal plan in college. Not sure who decided that students working on two BAs simultaneously wouldn’t have the need for a cafeteria, but there we were, 18-year-olds with a kitchen, a pot, a pan, a blender and a few cookbooks.

One of my go-to cookbooks had a terrific salad dressing recipe that I absolutely adored and made all the time. The garlicy miso dressing was made for a crunchy lettuce such as Romaine. After graduation, I moved to a cockroach-infested but very affordable one-bedroom in a soon-to-be-gentrified neighborhood in Harlem.  But I soon learned that cockroaches and cookbooks do not mix, and I had to toss out nearly my entire collection, including the one that had the amazing salad dressing recipe.

It was about a year ago that I discovered Freecycle, a grassroots and non-profit group of folks who give and get stuff for free. It’s really pretty simple: What you have, but don’t want, may be exactly what someone in your town is looking for. And what you want but don’t have, may be exactly what someone in your town is trying to give away. You can give and take all you want, but you can’t “want” (request a particular item) until you give. So far this year, I have given away an exercise bike with a busted monitor, a dozen antique doors a friend of mine had in his yard (don’t ask), and an out-dated ipod Nano car charger. And some of the gems I have found off of Freecycle include a panini press, some Laura Ashley cake plates, and about a dozen cookbooks, including a brand-new copy of that cookbook from college that had the magical salad dressing recipe! Isn’t karma amazing?!?

Just a warning about Freecycle: The e-mails are fast and furious nearly 24/7, so you might want a digest to come to your inbox once a day, especially if you sign up for a few Freecycles in your area. The downside of the digests is that you might miss out on some of the good stuff which gets claimed as soon as it’s posted.

Miso Dressing from Quick Vegetarian Pleasures by Jeanne Lemlin

Miso's one of those things that can hang out in your fridge for eons with no adverse effects.

3 tablespoons rice (white) miso or barley (red miso)

2 garlic cloves, chopped

2 tablespoons apple cider vinegar, or red wine vinegar

1 1/2 tablespoons oriental sesame oil

3/4 cup vegetable oil

1/3 cup plus 1 tablespoon water

Makes 1 1/2 cups

1. Blend the miso, garlic, vinegar and sesame oil in a blender or food processor until smooth.

2. With the machine still running, very slowly pour in the oil. When the mixture has emulsified, slowly pour in the water and blend 10 seconds or so. The finished dressing should have a smooth, mayonnaise-like consistency. The dressing can be kept refrigerated for up to 4 days.

Liquid gold. My bet is one of us will have a need for a fresh salad by lunch tomorrow.

Note: If by chance your dressing separates, try scraping the dressing into a bowl. Clean and dry  the processor or blender, put 1 tablespoon cold water in the container, and turn on the machine. With the cover off, pour in 1 tablespoon of the dressing. Once incorporated, add another 1 tablespoon of dressing. Once incorporated, add another 1 tablespoon dressing. Repeat until all the dressing has been added. It should rebind to a thick, creamy consistency.

CSA SNAFU

Fresh from the CSA... ignore the plastic bag.

I feel like I’ve been an unwitting contestant on Iron Chef: CSA for the past week, trying to use up my box of picked-for-me produce. Some things have been great. I made the basil into a pesto, roasted the cherry tomatoes, and tossed the whole kit and caboodle together with some pasta and black olives. The Kentucky Wonder Beans were delicious in a Chinese stew I made with some potatoes I found in the cupboard and a few mushrooms who were just waiting to fulfill their dinner destiny at the bottom of my crisper. Of course, I failed at taking photos of either dish, but I promise to make the stew in a few weeks and share it with you. I would make it again next week, I loved it so much, but I think Rich would prefer a little more variety on his plate.

And then there were the four poblano peppers and the butternut squash.

What do you do when half your CSA makes you sick?

By some miracle, I came across this recipe off a blog I read about in this New York Times article about a doctor who believes eating well is essential to being well. It looked easy enough, and I had everything the recipe called for in my pantry — quinoa, pecans, and dried cranberries. I had stock hanging out in the fridge, and I ignored the call for non-fat sour cream, which is how I usually deal with dairy in recipes. It sounded easy enough.

But it was a DISASTER. The poblano pepper skins did not peel as easily as the words on my screen said they would. And, it burned. A lot. Now I know I should have known better and used latex gloves to peel the peppers, but honestly, um, yeah, I don’t have any lying around my kitchen because a. I am not a surgeon, and b. really spicy things hurt my tummy, so owning a box of latex gloves seems silly. (Of course, I also received a set of steak knives as a wedding present, but I digress) So the skins didn’t peel right, the seeds burned my fingers, and the pepper just kind of fell apart in the process, making them impossible to stuff. Then I had a bite of one of the roasted peppers and thought, oh uh, I have to eat four of these? I could barely swallow a bite of one, they were so hot. In true Iron Chef fashion I made do with what I had and added some of the poblano peppers to the butternut squash sauce, in lieu of flavor from the non-fat sour cream. I sauteed up the bunch of kale and placed it atop the quinoa mixture and sauce.

Trust me, it looks a lot better than it tasted.

And, well, it was a pretty crappy dinner. It just wasn’t very good.

I didn’t bother signing up for the CSA box this week. My body can’t handle apples, pears, carrots or super spicy things — what I am going to do with with SIX habenero peppers, let alone another bunch of carrots, a half dozen apples and an Asian pear? I would love to get all my produce from a CSA, but it actually turned out to be a wasteful experience for me. I guess other CSA participants have no food intolerances, but I do. What I’m trying to say is, even though I would love to support the farmer, and be with him through floods and tomato blight, I can’t actually eat most of the produce he produces. When I have to give away half my CSA box, I’m not saving any money, I’m wasting the farmer’s time by not using his food he’s worked hard at growing, and then I still have three or four nights of dinners I need to find food for. I guess I do need a little more choice when it comes to what I put in my body.

Perhaps a CSA is just not for me.