For Rich’s birthday (not to be confused with Father’s Day or our anniversary, all which happen within a week of each other) I made strawberry-peach-basil shortcakes and shared the recipe for it in this week’s There is a Season column.
For Rich’s birthday (not to be confused with Father’s Day or our anniversary, all which happen within a week of each other) I made strawberry-peach-basil shortcakes and shared the recipe for it in this week’s There is a Season column.
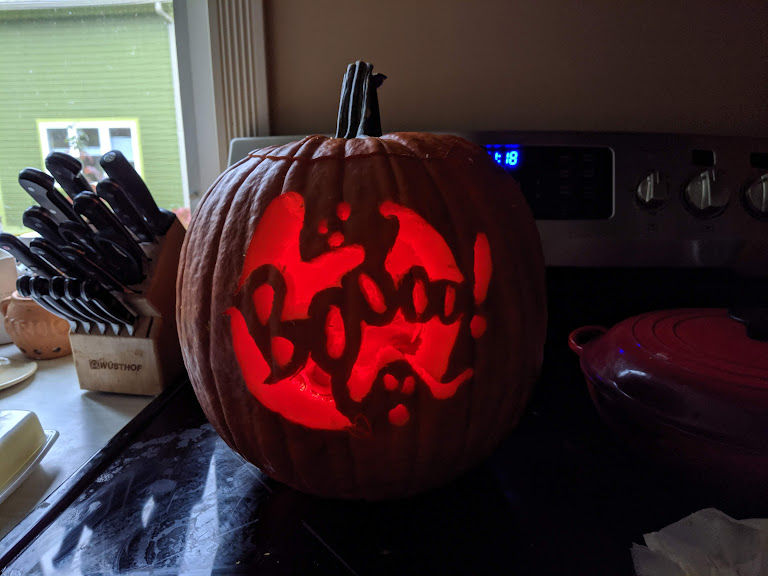
Rich and the girls went on a corn maze adventure last Sunday, and somehow brought home EIGHT pumpkins at the end of the day. Two were painted by the girls, and we’re halfway through carving the two big ones into jack-o-lanterns:
But the small sugar pumpkin, whose stem Lilli accidentally broke off, was roasted immediately and is now pumpkin pudding. I suggest you do the same with your sugar pumpkins.
To rescue the broken pumpkin, we cut it in half lengthwise and removed the seeds and stringy guts with an ice cream scoop. Then we roasted the pumpkin, cut-side down and brushed with olive oil in a 400F oven, for about 50 minutes.
The recipe couldn’t be simpler; everything goes into a blender. The cookbook – The L.L. Bean Book of New New England Cookery, by Judith and Evan Jones – was inherited from Nana Parr. A friend commented on the photo of the pudding, noting how she also had inherited cookbooks and recipes. “It’s so special to pass on that love.”
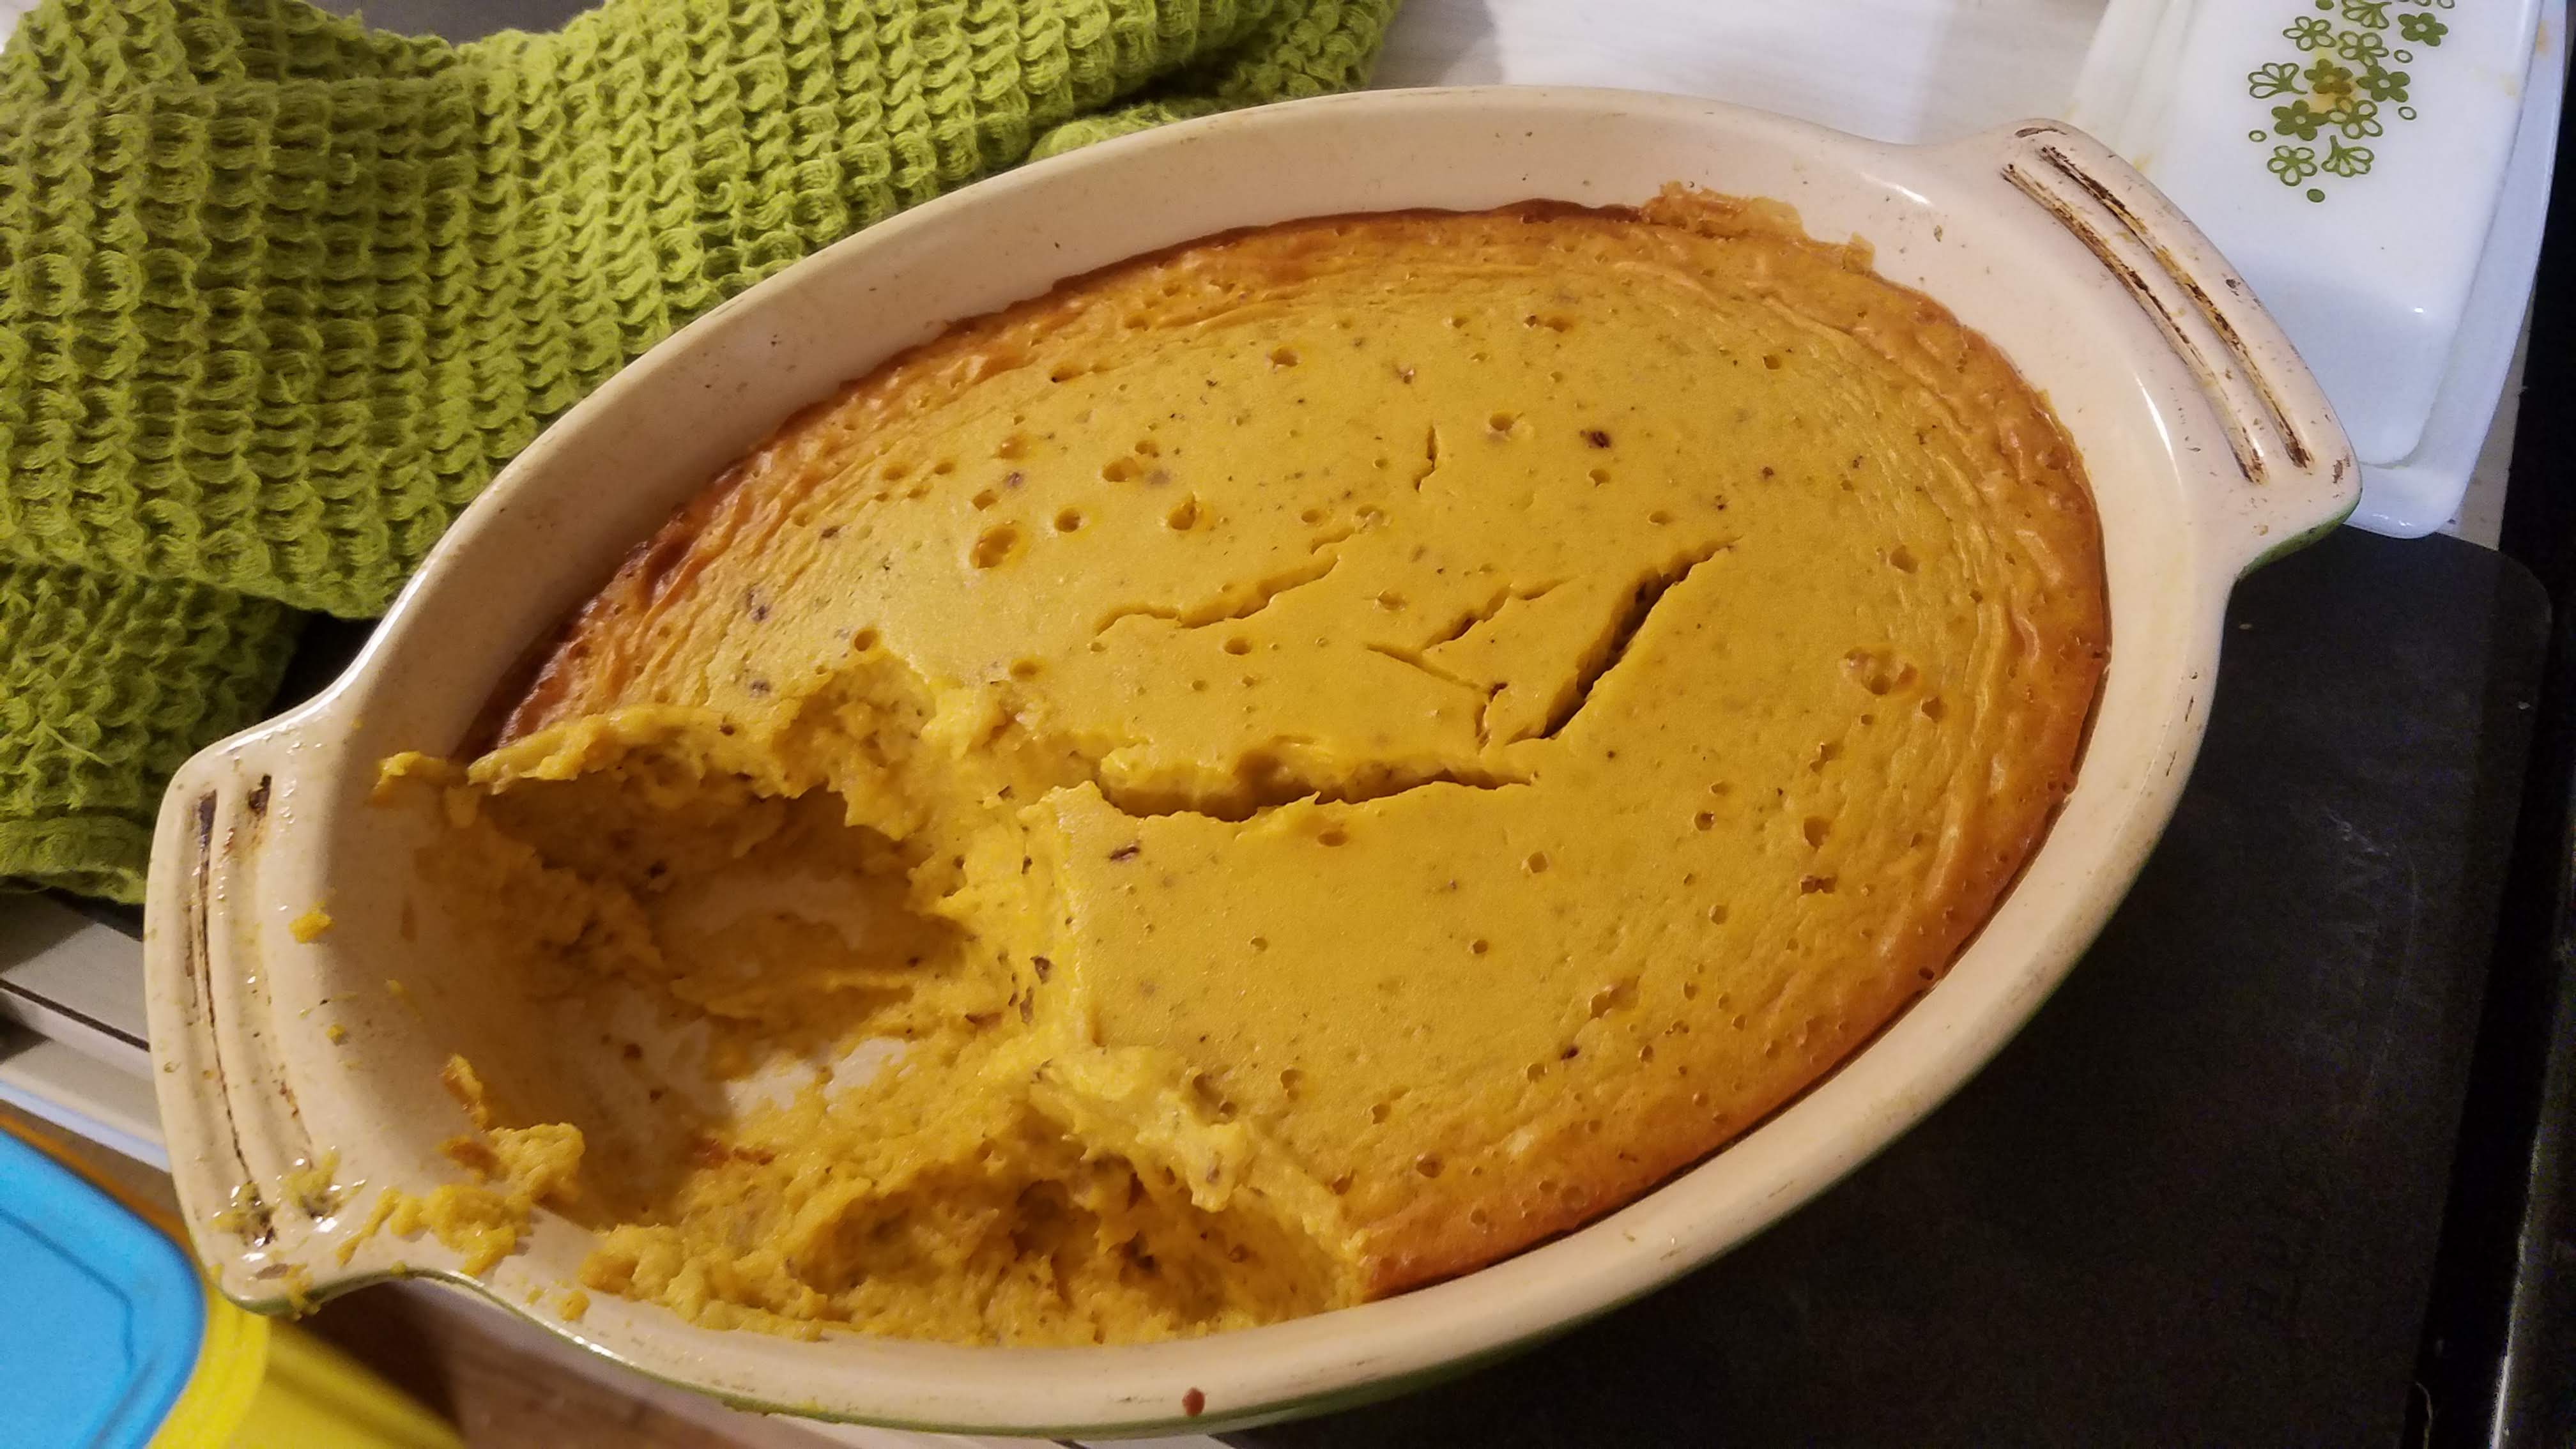
As for this recipe, I skipped the amaretto liqueur. I know a cup is a lot of honey. I personally made a point not to use the expensive kind I own for this recipe. I used golden raisins for my raisins. I find the pudding tastier a little warm, so I’ve been scooping myself servings, then heating it up in the microwave for about a minute before serving. This would be great with whipped cream, although we have been enjoying it with plain yogurt with a little maple syrup drizzled in. This is a pumpkin pudding that tastes like autumn without tasting anything like pumpkin spice.
Put your kettle on for the water bath before you start making the pudding; it comes together that quickly.
Pumpkin Pudding from The L. L. Bean Book of New New England Cookery by Judith and Evan Jones
Ingredients
2 cups pumpkin puree
4 eggs
½ cup water
1 cup honey
½ cup raisins
½ cup currants
4 Tablespoons flour
Directions
Preheat the oven to 350F. Heat a kettle of water.
Put all the ingredients in a food processor or blender and mix thoroughly.
Pour the batter in a shallow, lightly buttered baking dish, and place the dish in a pan containing about 1 inch of hot water.
Bake in a 350-degree oven for 50 to 60 minutes. Serve hot or at room temperature.
Serves 6 to 8.
The heat was on us like five bullies, even in the shade of the tree in the front yard. But the line-up of little sluggers didn’t seem to care. They were waiting to take their swings at the unicorn piñata hanging from the lowest branch. As the final blow spilled erasers, glow sticks, kazoos, and temporary tattoos onto the lawn, one of the grown-ups yelled out, “Call Alex Cora, we have a new slugger the Sox need!”

But let’s back up a month, when our younger daughter, Beatrix, turned 4. June is a crazy month for us, full of birthdays, Father’s Days, and our anniversary. So the 4th birthday party was put off to mid-July. Little did we know it was going to be in the middle of the first heat wave of the summer.
It’s actually fitting that it was so hot that day because the theme for the party was inspired by Bea’s favorite book, Island Born by Junot Diaz. It’s a beautiful book about a little girl named Lola who goes to a school where all the students are from somewhere else.
Lola’s class assignment is to draw a picture of where they are originally from. Lola is from “the Island” (the Dominican Republic) but left before she could remember. She goes through her neighborhood asking everyone what they remember. She discovers the sun “can be as hot as five bullies.” She eats crispy empanadas and waxes poetic about mangoes. She learns about the music, the vivid colors, and finally, why her family left the Island.
I took the idea of a Dominican-themed birthday party as a challenge. I convinced a local restaurant to fry up a batch of crispy, vegetarian empanadas. I’m not sure Big Papi would have approved, but they were quite delicious even without meat. Dominican mangoes were magically on sale at the international store this week. We also served agua de cocoa, agua fresca, and pizza for the kids.
It wasn’t all on theme. Using this week’s CSA I made a massaged kale salad with grated carrot, dried cherries, sunflower seeds, and cucumber, and dressed it with a fresh lemon thyme dressing. I also made a corn salad that was more Mexican than Dominican, with pickled onions, grape tomatoes, avocadoes, radish, topped with Cotija cheese, and dressed with a cumin lime dressing.

At some point in the home stretch the party morphed slightly with some last minute rainbow-unicorn purchases: a massive balloon, wading pool, and the aforementioned piñata. The pool paired nicely with the used bouncy castle I found online for a hundred bucks late this spring. When they weren’t hiding from the heat in the house, the kids dashed between the pool and the bounce house.
But really, I’m here to talk about the dessert bar Bea and I devised. Rich says now that if he knew what I was up to, he would have put a stop to it, or at least thrown himself in front of the train. But last week I received an offer I couldn’t refuse. Nellie’s Free Range Eggs reached out to me and asked if I wanted to try out their products. Even better, they offered me a gift card to help pay for the groceries.
I try to eat local eggs and dairy, so the first thing I checked was where these eggs were coming from. New Hampshire is close enough for me. Then I learned the hens live on free-range, small family-run farms, and are Certified Humane. This was just what I needed, especially because my colleague who I usually get my eggs from is on vacation this month.

For the dessert bar I baked:
(When I type it out in bullets, it does seem like a bit much.)
These blondies were inspired by a recipe I made a few weeks back for blondies with rhubarb and white chips. I had read about a recipe from Sister Pie, which we got to visit last summer when we went to Detroit. I don’t actually own that cookbook, so I used my own blondie recipe and enhanced it. Those blondies are great, but I’m guessing most of you don’t have a pound of rhubarb squirreled away in your downstairs freezer like I do. On the other hand, it is cherry season right now.
Whether you use rhubarb or cherries, the secret to this recipe browning the butter, which lends a butterscotch flavor to the final blondies. It takes just a few more minutes than if you’re melting a stick of butter in a small saucepan. Stand by it and watch as it goes from yellow to brown but make sure to stop it before it burns. I timed it, and it took about 7 minutes to brown on my induction stove.
Rich bought me an olive pitter years ago that does double duty during cherry season. I still pit my girls’ cherries before I serve them. It also came in handy for a clafloutis that I made last week. If you don’t have one, you can just halve the cherries to de-pit them, or just squeeze the pits out by hand if you don’t mind getting cherry-stained fingers.
Brown Butter Blondies with Fresh Cherries and White Chocolate Chips
Ingredients
½ cup melted butter
1 cup dark brown sugar
1 cup light brown sugar
2 eggs, preferably Nellie’s Free Range Eggs
½ teaspoon salt
1 ½ cups flour
2 teaspoons baking powder
1 teaspoon vanilla
1/2 cup fresh cherries, pitted and quartered
1/2 cup white chocolate chips
Directions
Preheat oven to 350 F.
Butter a 9×13-inch cake pan.
Melt a half cup (one stick) of butter in a small saucepan. In about seven minutes, the yellow butter will develop brown spots as it turns from frothy to brown. Watch carefully to make sure it doesn’t burn.
Mix all of the ingredients together, in order of appearance in the recipe, combining them well. Spread in the pan and bake for 25-30 minutes, or until dry on top and almost firm to the touch. Let cool for 10-15 minutes, then cut into small squares.
This post was in part sponsored by Nellie’s Free Range Eggs, now in partnership with the Boston Red Sox!
It was a Baker’s Dozen at our house for first night seder. I recently eliminated fish from my diet, making this year’s seder completely vegetarian. For those curious, I served quinoa stuffed mushrooms; this mushroom and spinach egg bake; beet, orange and pickled fennel salad; roasted asparagus; roasted Japanese yams with an herby yogurt sauce; and matzo pizza for the kids. My parents brought a broccoli kugel and roasted potatoes to round out the meal.
But I’m not here to talk about dinner. Nope, we’re going to focus on the gluten-free dairy dessert that was a big hit at dinner, and on the Internet, this weekend.
 Sometime last month I decided on doing a pavlova: a bed of airy meringue, topped with fresh whipped cream with fresh berries piled on top. This gave me ample time to find a good recipe. I cruised the Internet to find a reliable kosher-for-Passover pavlova recipe. I settled on one from Jamie Geller’s The Joy of Kosher. I made her tahini halvah brownies back in January, and they were superb.
As a lucky bonus to my quest for the perfect pavlova, this week I caught an episode of Simply Ming on PBS Create, in which he made pavlovas with Joanne Chang of flour bakery fame. I watched it carefully, taking notes as to how, why, and when Joanne added her sugar to the egg whites a spoonful at a time, and how long she cooled her meringue after it baked in a very low oven.
The big changes for a kosher-for-Passover pavlova were using potato starch instead of cornstarch and adding a smidge of vinegar; this helps with drying the meringue out. Although this recipe isn’t such a big deal to put together, you do need time. I did this at night so I could let the meringue dry out overnight in the oven as it cooled. I’d suggest you do the same.

The hardest part of this recipe is separating five egg whites, but then your machine does the rest of the work. Although I have hand-held egg beaters for Passover, it took me until this year to realize my Kitchen-Aid Mixer’s attachments are metal and could easily be kashered with some boiling water. If you can chill your bowl and whisk ahead of time, so much the better. The eggs are supposed to be cold, as well, so they can come right out of the fridge.
I made this Thursday night and whipped up the cream Friday midday, stuck that in the fridge, and put the dessert together during the seder. The whole process was simple and fuss-free. The results were no less than spectacular.
Mixed Berry Pavlova, adapted from Jamie Geller
Ingredients
For the Pavlova
5 cold egg whites
1 teaspoon kosher salt
2 teaspoons vanilla
1 cup sugar
2 teaspoons potato starch
1 teaspoon white wine vinegar
Whipped Cream (recipe follows)
Garnish: Mixed Berries (I used blueberries, raspberries and blackberries)
Directions
Preheat oven to 250°F. Using a dinner plate, trace a 9-inch circle on a piece of parchment paper. Flip the paper so ink does not get on the meringue and set aside.
Whip whites, salt, and vanilla on high in a mixer until firm. With the motor running, add sugar, a spoonful at a time, until whites are glossy and very stiff.
Gently fold potato starch and vinegar into meringue with a spatula.
Transfer meringue to prepared parchment paper. Form meringue into a rustic bowl. It’s not necessary to make it perfect. Just be sure to make the center thick enough to support the filling.
Bake pavlova at 250°F for 1 ½ hours. Turn off the oven and do not open the door for at least 6 hours or, better yet, overnight. The residual heat will crisp up the meringue and keep humidity out.
Place pavlova on a serving platter. Pile whipped cream on pavlova. Add berries.
WHIPPED CREAM
With a mixer, or by hand, whip cream and sugar in a chilled bowl will chilled beater until soft folds form.
Whip until soft peaks form.
Let’s see, it’s been a month since we celebrated Lilli’s birthday party, and I have just a few weeks before Passover starts. Apologies for those expecting a gluten-free recipe for the holiday, but I’ve wanted to share these whole-wheat chocolate chip cookies for years on the blog. It’s 6:51 am, and it’s the weekend. Carpe Diem, my friends.

This year Lilli made it clear she did not want a cake, but rather these cookies by Kim Boyce that made the rounds, let’s see, oh, nine years ago. We baked dozens and froze them two weeks before the party, along with these spectacular and very simple blondies. We also made these halva tahini brownies that were so simple, and so so delicious, that really, the only thing you should be doing right now is melting some chocolate into olive oil.

But yes, these cookies. They are a fan favorite. The whole wheat makes for a deeper, nuttier taste. The butter remains cold so you don’t have to plan in advance to made them as you do with most cookie recipes that call for softened butter. I promised my friend Ben a care package, and I do plan on mailing some to him. We got up early the day of Lilli’s party and made the smaller sized ones into ice cream sandwiches because, well, Carpe Diem, my friends.

We had about 50 people in total to the house that day. A mix of current kindergarten friends, friends from PreK, friends from my Hebrew school class that Lilli comes to every Sunday with me, and a few pals from around town. Parents were invited to drop off or stay. Most stayed once they saw the spread in the kitchen.
This year I served: Michael Solomonov’s hummus (we used the Instapot for the first time to (intentionally) overcook the chickpeas; caramelized onion dip; butternut squash and chickpea salad (which was kind of eh); Brussels sprouts with leeks, parmesan and chestnuts; Vietnamese tofu; peanut butter noodles; farro with dried apricots, mushrooms and hazelnuts; marinated roasted red peppers served with fresh mozzarella and crusty bread. You know, the usual fare for a six-year-old’s party
There was also the usual chips, dip, Pirate’s Booty, Lilli’s stuffed dates, pizza, and crudite for nibblers.
The kids clearly had a blast playing dress-up, doing art projects, and for some of the boys, playing tag inside the house. There may have been a lightsaber that needed confiscation.

We sang happy birthday and enjoyed the aforementioned desserts, along with a Panda chocolate chip cookie cake by Papa, and some melon. It was a great party. And I still have about a dozen cookies in the downstairs freezer, despite Rich’s best efforts to finish them.
Kim Boyce’s Whole-Wheat Chocolate Chip Cookies
Ingredients
Dry Mix
3 cups whole wheat flour
1 ½ teaspoons baking powder
1 teaspoon baking soda
1 ½ teaspoons kosher salt
Wet Mix
8 ounces (2 sticks) cold unsalted butter, cut into ½ inch pieces
1 cup dark brown sugar
1 cup sugar
2 eggs
2 teaspoons pure vanilla extract
8 ounces chocolate chips
Directions
Well then. Now that I’m done teaching Hebrew school for the year, I can get back to ye olde blog. But honestly though, March is such a let down in terms of food. Then it was Passover, which I meant to write about, because let me tell you, we ate like kings every day of the holiday. But then April was unusually cold, which meant that the asparagus was late this year. It’s always the first week of May, but it was closer to a week and a half in before stalks started popping in my front yard.

Rhubarb was also late this year, but has now officially started taking over people’s yards. Someone had so much of the plant that they put out a call on my beloved local Buy Nothing Facebook page, where my finds so far have included a nightstand, a bathroom clock, curtains, pizza, children’s snow pants, and, today, four free duck eggs.
I picked about 2 pounds worth of the ruby and emerald stalks, and was going to make it into a rhubarb compote, then use that to make a rhubarb spoon cake in Rich’s cast-iron skillet. But I only had a quarter cup of flour in the house, so compote was all I made in the end.

However, inspiration struck as I was chopping up the rhubarb, and I added about 2 cups of cleaned and quartered fresh strawberries (bought for and rejected by the girls). I think if I’d had some fresh ginger on hand it would have rocketed this compote out of the stratosphere. All that being said, this brand new compote recipe is divine, and I even got the girls to bed a half hour earlier than usual tonight because I needed to share this with you that badly.

The rhubarb compote and spoon bread recipe is from Erin French’s The Lost Kitchen, which I wrote about last summer, because her custard with freshly picked blueberries and basil, remains one of the tastiest and most elegant desserts I have ever served.
I’ve enjoyed this on Greek yogurt (full fat, please) as well as on local vanilla ice cream. Yes, both; don’t judge, it needed to happen. The compote now sitting in a glass jar in my fridge and will last about a week. I mean, the compote will be good for about a week. I don’t see this lasting past Friday.

Rhubarb and Strawberry Compote
Adapted from Erin French’s The Lost Kitchen
Ingredients
3 cups chopped rhubarb (1-inch pieces)
⅔ cup sugar
Zest of one lemon
Juice of one half lemon
2 teaspoons cornstarch
2 cups cleaned and quartered fresh strawberries
Directions
In a medium heavy-bottomed saucepan, combine the rhubarb, sugar, lemon zest, lemon juice, and cornstarch. Bring to a summer over medium heat, stirring constantly until the rhubarb becomes tender and sauce-like, about 5 minutes. Stir in the cleaned strawberries and cook for about 4 more minutes. Remove from the heat and allow to cool to room temperature. This will keep in the fridge for up to a week.
My Cousin Larry is moving to the South of France in just about a month. He’s looking forward to leaving Trump and all his madness behind. He makes a point to say that Trump is not the cause, but a symptom of much larger problem. I don’t disagree.

Cousin Larry is probably the best family member to do “family.’’ He can be counted on to attend all family simchas, like weddings, baby namings, and bat mitzvahs. And he was key to the Weinberg Family Reunion in London back when I was pregnant with Beatrix. In August, when Lilli and I cat sat in New York City for a week, we met up one afternoon and saw the Calder exhibit at the Whitney. Afterwards, we took Lilli to a candy shop, and then journeyed to Dominque Ansel Bakery during which Cousin Larry and I discovered that our behavior around baked goods — and as it turns out, cruise ship buffets — was shockingly similar. It was as if we were related or something!
Larry’s also the family genealogist. So a few weeks back, when he was visiting Aunt Sydney to review old photos and the family tree he’s painstakingly put together, he made a point afterwards to come to our house for a meal and a nice long afternoon visit.
Because his wife Ashley is allergic to nightshades, I made a point to serve all sorts of things he usually has to avoid, like cauliflower stew and marinated roasted peppers with fresh mozzarella. We also had a farro salad with Castelvetrano olives, walnuts and golden raisins, and roasted broccoli.

And then we had this lemon pie for dessert. As I’d mentioned back in the fall, I’ve been on a pie kick, and this has become my go-to “I’ve got nothing in the house, but I can make fantastic a pie in no time flat” recipe. I’ve taken to keeping sweetened condensed milk and graham crackers on hand for this recipe. Lemons are something you should always have on hand. Limes will work too.
The crust is the same as for this peanut butter chocolate pie, and is originally from Food and Wine’s Desserts cookbook. I use it all the time now. I even purchased Kosher-for-Passover Graham crackers and brown sugar for the holiday. Now I can whip up pies on a moment’s notice for unscheduled visitors. Or just because.

Because every recipe I’ve read for this sort of pie has you add room temperature eggs to the mix, do yourself a favor and take two eggs out of the fridge and place them in warm water as you make the crust. It will make things move along that much faster.
At some point we will make it to France to see Cousin Larry in his chateau. He’s already scoped out the best place to buy pastry for when we come.

Lemon Pie
For the crust
One plastic package Graham crackers, broken
4 Tablespoons unsalted butter, melted
¼ cup brown sugar
For the filling
1 can sweetened condensed milk
Juice of 2 lemons, plus their zest
2 eggs, room temperature
For the topping
1 cup heavy cream (Or use 2 cups if you want a very dramatic pie.)
2 Tablespoons sugar
Directions
Before you begin making your crust, place 2 eggs in warm water to bring to room temperature.
Preheat the oven to 350F.
In a food processor, pulse the Graham cracker crumbs with the melted butter and light brown sugar until the crumbs are moistened. Press the crumbs evenly into a 9-inch glass or metal pie plate. Bake the crust for about 10 minutes, just until lightly browned. Let cool.
Meanwhile, make the filling. In a large bowl, whisk the lemon juice with the lemon zest, condensed milk and eggs until smooth.
Pour the filling into the cooled crust and bake for about 20 minutes, until set around the edges and slightly jiggly in the center. Let pie cool to room temperature, then refrigerate until you serve it, at least two hours.
Make the whipped cream: Using a mixer, beat the heavy cream until soft peaks form, 2 minutes. Beat in the sugar until stiff peaks form, 1 minute. Mound the whipped cream on the pie.
Serve.
And so we learned during our December break that one really can cry over spilled milk, because that’s exactly what Lilli did as soon after she spilled milk all over my laptop. I’ve been computerless since the day after Christmas, which has meant no blogging, for Cheap Beets or Hebrew school.

Still, we’ve needed to eat, and my kitchen didn’t shut down during this long pause. Nope. We’ve roasted watermelon radishes and drizzled herbed green tahini sauce on top. Roasted sweet potatoes have been dipped in a Greek yogurt dip, spiked with garlic and lemon. I’ve gotten into lentils, and engineered a potluck salad of lentils, roasted beets, red onion, dried cherries, feta and a sweet balsamic dressing. And, oh, my, we made a marvelous and moist carrot cake that had nearly a pound of of dried cranberries, golden raisins, coconut and pecans.
I am pretty sure that all these dishes, and many more, have been documented on my Instagram feed. But one of my baking feats, a chocolate beet cake with chocolate orange glaze, seemed to garner the most likes, oohs, and aahs. It was from a library book, Home Grown: Cooking from My New England Roots by Matt Jennings, which I borrowed based solely on the title of the book. I hadn’t recognized the author’s name at first, but as soon as I opened it up I realized this was that Rhode Island chef that made his way to Boston. Although I’ve never eaten at any of Matt Jennings’ restaurants, the amount of praise food writers have bestowed upon him in the past few years made me quite excited to read the book, based on title alone. Rich tells me he was on Radio Boston last week.

And it was in this recipe about beets that had me nodding enthusiastically in agreement:
Beets are one of those ingredients that are perpetually in season in New England. We see them toward the end of summer, all through the fall, and into winter, with a spring variety poking through the cool earth in early April as well.
I mean, not only have I named my food blog after the rosey root, but we basically eat what the farmer digs up every week, and beets make a perpetual appearance in our CSA.
The recipe is a simple one; I don’t think the girls budged from their Bubble Guppies episode while I whipped it up in the kitchen. Because I am me, I already had roasted beets awaiting in the fridge. I actually skipped over his directions on how to roast beets because his oven is much too cold (325F). I’ve found you need at least a 400F oven to soften them.
With fresh orange zest in the glaze I’ve found this to be a perfect example of a winter cake. I hope you like it. We certainly have.
Chocolate Beet Cake with Chocolate-Orange Glaze
Chocolate and beets are a natural pair. The earthiness of the beets contrasts with the richness and sweetness of chocolate. The milk chocolate frosting on this cake is laced with orange zest – orange tastes great with both chocolate and beets…
Makes one 10 ½-inch bundt cake; serves 12.
For the cake:
Unsalted butter, for greasing
1 pound red or golden beets, roasted
1 tablespoon extra-virgin olive oil
Kosher salt
1 ¾ cups all-purpose flour, plus more for dusting
2 cups sugar
¾ cup unsweetened Dutch-process cocoa powder
2 teaspoons baking soda
1 teaspoon baking powder
1 cup buttermilk
2 eggs
½ cup canola oil
1 teaspoon pure vanilla extract
For the glaze:
6 ounces good-quality milk chocolate, chopped
½ cup heavy cream
Zest of 1 navel orange
1 tablespoon extra-virgin olive oil
Pinch of kosher salt
Flaky salt, such as Maldon, for garnish
Make the cake:
Preheat oven to 350F. Grease with butter and flour a 10 ½-inch Bundt or 10-inch angel food cake pan.
Peel your roasted beets and put them in a food processor; process until smooth. Measure the beet puree and set aside 1 ¼ cups (10 ounces); reserve any remaining beety puree for another use (it can be combined with ricotta or goat cheese and used as a sandwich spread).
In a large bowl, sift together the flour, sugar, cocoa powder, baking soda, baking powder, and 1 teaspoon kosher salt. In a separate bowl, whisk together the buttermilk, eggs, canola oil, vanilla and beet puree. Stir the wet ingredients into the dry ingredients and mix until well combined. Transfer the batter to the prepared cake pan and bake until a tester inserted into the center of the cake comes out clean, 55 to 60 minutes.
Transfer the cake to a wire rack and let cool in the pan for 15 minutes, then turn the cake out of the pan and let cool completely on the rack.
Make the glaze:
Put the chocolate in a bowl. In a small saucepan, gently heat the cream to a bare simmer. Pour the cream over the chopped chocolate and add the orange zest. Let stand for 10 minutes, then gently whisk until smooth. Whisk in the olive oil and kosher salt.
Set the cake (still on the wire rack) over a rimmed baking sheet. Pour the glaze over the cake and use an offset spatula or spoon to spread the glaze over the top and sides of the cake, letting the excess drip off. Garnish with a sprinkle of flaky salt.
 And sometimes you have such an overwhelming week that you accidentally email your food blog subscribers the newest Hebrew School post. My apologies for my subscribers, all 17 of you, half of whom are related to me, for the error. But now you know why posts this season have been fewer; it’s because I’ve been working a second job and tending to a second blog for it.
Also new this season: we’re using a Winter CSA. The vegetables were so extraordinary from our summertime CSA at Mountain View that we decided to do their Winter CSA, which is biweekly. They promised more than 30 lbs. of root vegetables. I wasn’t expecting nearly 15 lbs. each of carrots, sweet potatoes and potatoes. But sometimes you’ve just got to go with it.
Not that I’m complaining, but I did turn to Facebook last month in hopes of some new carrot ideas. My two best takeaways were roasting them with honey and lots of Aleppo pepper, then drizzling yogurt and sprinkling fresh mint on top. The second was this carrot bread that a Boston friend, Amy, posted straight to my page. She has always served me top notch baked goods, so I took notice and got out the food processor that same night.

This carrot bread is reminiscent of carrot cake, my favorite cake, so that’s a good thing for me. It’s made with oil, making it dairy-free. If you use Earth Balance to butter the pan it stays that way. It’s great sliced in the morning, with maybe a swipe of cream cheese or butter, but it’s great plain, too. It freezes like a dream. I served this alongside some dried cranberry cream scones, jelly doughnut muffins and cut up pineapple for the parent coffee schmooze at services yesterday morning, and it was very much appreciated.
 The recipe makes two loaves which means one automatically goes into the freezer. Bake this tomorrow and have one at the ready when friends stop by unexpectedly.
I’ll be back soon with a kale recipe for Chanukah. Yes, really.
Carrot Bread
4 eggs
2 cups sugar
1 ¼ cup oil
3 cups flour
2 teaspoon baking powder
1 ½ teaspoon baking soda
¼ teaspoon salt
2 teaspoon cinnamon
2 cups finely shredded carrots
Beat eggs, add sugar, beat, add oil. Beat. Stir in dry, mix until smooth. Stir in carrots. Bake at 350F for 1 hour until toothpick comes out clean.
We live in walking distance of the Florence Pie Bar, which is so quaint and hip and perfect that NPR featured it in their story last month about how hip and full of Hygge pie has become. As adorable as the shop is, with its orange door and seating area the size of a postage stamp, the $5-a-slice price tag keeps our visits infrequent. Lots of people do go; some people hang out there. Just not us.

Still, I follow them on Instagram and last February, when they posted a peanut butter pie topped with a crown of fudgy chocolate, I picked up Lilli (who is perfectly capable of walking) snapped her into her car seat, and zoomed over. You know how I am about the holy marriage of chocolate and peanut butter. The slice was amazing, but that’s the one and only time I’ve been.
But with their slices in my feed, I get a challesh, a hankering, for pie pretty regularly. So when I was flipping through What Can I Bring? Southern Food for Any Occasion Life Serves Up, by Today Show regular Elizabeth Heiskell, I was stopped in my tracks by the Peanut Butter-and-Banana Pudding recipe. Inspiration struck: What if I took just the peanut butter mousse part of the recipe, made myself a pie crust with all the leftover Graham crackers I had in the house from Sukkot art projects, and topped it with ganache? I mean, that’s what cooking and baking is all about, right? Inventing, and reinventing and borrowing, and building off a great idea.

So that’s exactly what I did. After consulting with Sylvie and my mother who both agreed there needed to be a layer of ganache in between the crust and mousse, to prevent the pie from getting soggy. And it was glorious! Just glorious! Sylvie has been given explicit instructions to serve this at my shiva if I go first (hopefully a very long time from now.) It’s a very rich pie, so a thin slice is all I need to get my fix.
This is a dead simple recipe which takes minutes to put together. You honestly don’t need fancy chocolate for the ganache; I just used the chocolate chips I keep in my freezer. The ratio of heavy cream to chips was 1:1 so it made for a very thick layer – key for me because I do love that combination of chocolate and peanut butter. I have no allegiance to peanut butter brands, but for this recipe don’t use the natural stuff.

We still have tons of Graham crackers leftover, and I’m still creating new pies. I made this lemon pie that I’ll share with you soon. That was even easier to make, if you don’t think you’ll get sick of eating pie. I don’t think I will!
Buckeye Pie
First, make your Graham cracker crust:
Ingredients
1 sleeve Graham crackers, broken
4 Tablespoons unsalted butter, melted
¼ cup light brown sugar
Directions
Preheat oven to 350F.
In a food processor, pulse the graham cracker into crumbs. Add the melted butter and light brown sugar until crumbs are moistened. Press the crumbs evenly into a 9-inch glass or metal pie plate. Bake the crust for about 10 minutes, just until lightly browned. Let cool.
Make the Peanut Butter Mousse
Ingredients
3 cups creamy peanut butter
8 ounces (1 cup) butter, softened
1 cup (about 4 ounces) powdered sugar
Directions
Beat the peanut butter and butter with an electric mixer on medium high heat until smooth, about 2 minutes. Reduce the speed to low, and slowly add powdered sugar, beating until smooth.
Make the Ganache
Ingredients
1 cup heavy cream
1 cup chopped chocolate (chocolate chips are fine by me)
Directions
Bring heavy cream to simmer on stove top, stirring occasionally, for about 5 minutes. Turn off heat
Add chocolate chips to the cream. Let them sit, undisturbed, for 5 minutes.
Stir. It will turn velvety. Let cool slightly.
Assemble the Pie
Once your pie crust has cooled down, pour on a thin layer of ganache. Let cool. You should still have ¾ of the ganache left.
Once the ganache has cooled, spread all the peanut butter mousse on top of the chocolate layer, and spread evenly with a spatula.
Pour the remaining ganache on top of the peanut butter mousse.
Place in fridge to firm, about 2 hours.